IN CLASS: SHAPE
Shape Discussion (Shape Relationships, Pos./Neg., Org./Geo.)
Illustrator: SHAPE (tools, layers, live trace)
Homework Overview
HOMEWORK:
*Finish Shape Elaborations (Illustrator)
*Check website for additional materials (if any...)
Finish: Shape Elaborations
Materials:
Illustrator/Computer Access + Printer access (9th Floor of Art+Design Building), bristol, one sheet of Matte Photo paper (you may have to purchase a small package if you're printing at home/otherwise the print lab will have the paper), and something to save your work on (FlashDrive, or you might be able to save them to an email account-attach them to an email to yourself).
Overview:
Using Illustrator create a composition based on strong figure/ground relationships utilizing geometric/organic and positive/negative shapes.
There are 3 levels or layers to this assignment (seen in your final composition):
Other than the white of the paper (or background color) - you will be creating each layer individually, then bringing them all together for your the final stage of the composition. I will outline the process step by step.
Let us begin... I will state clearly and in simple language how to proceed through each step (in ITALICS and UNDERLINE) with a FURTHER definition following (for those who require additional assistance).
A. PATTERN CREATION (#1-7)
Create a pattern in a uniform light grey. Create a rhythm through repetition or alternation. Look under the SHAPE heading on this website for examples of wallpaper designs if needed. Think about your principles (use them as a check list to consider each).
1. *Open Illustrator (under graphics folder if you're at Columbia).
*New Document/Document Type Window: choose Print Document
*Letter Size (8.5 x 11")
*Name the file: (lastnamedateproject title).
Remember OPEN APPLE "S" to save your document every 5- 10 minutes or so.
2. On CANVAS (non-printable area): Create 5 unique shapes (organic/geometric/or mixture) that you will use to piece together/create your grey pattern.
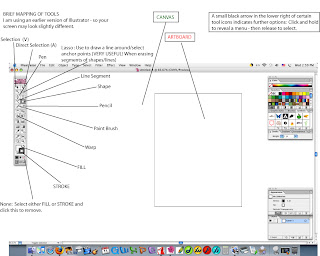
*TOOLS: Pen, Pencil, Selection, Direct Selection, Shape Tools, Line Segment - any tools that can aid in your shape creation.
*NO STROKE. On the left of your screen you will see the tool menu/tool box. At the bottom are two overlapping squares: "FILL" and "STROKE". Activate STROKE - the square with a frame (click on it once to bring it forward/activate it). Below FILL and STROKE are a series of smaller boxes - look for the box with a RED SLASH. Click the red slash to DEACTIVATE STROKE. Your shapes will no longer have an outline/contour line.
*FILL COLOR: ALL LIGHT GREY. Again, bottom of tool box - activate FILL by clicking once on the square without a frame. Now double-click the FILL box and the COLOR PICKER window will appear. Inside the color swatch, click/drag the circle to the far left (towards a grey scale). Move your circle to the upper left - NOT WHITE but LIGHT GREY. Then click "okay". Your FILL color is now light grey.
*Vary the character of each shape (scale proportion, etc.) - remember they're all in relation to 8.5 x 11" (your printable area).
*Keep shapes simple and interesting
Illustration 1: Tools (these were made on an OLD version of Illustrator so your screen will look a bit different)
CLICK ON IMAGES FOR A LARGER VIEW
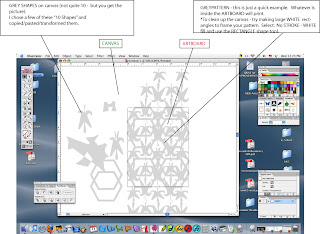
3. On ARTBOARD (printable area) select and arrange shapes (click and drag onto ARTBOARD)to create a FLAT - REPEATING MOTIF - a rhythmic pattern.
*REMEMBER-Only objects on ARTBOARD (printable area) will print. So some of your pattern can "overflow" onto canvas.
Illustration 2: Grey Pattern
4. Once your PATTERN is established on the artboard (you're satisfied with composition/result):
a. Delete any extra characters/objects/etc. on CANVAS -clean up work space! (simply select and hit delete)
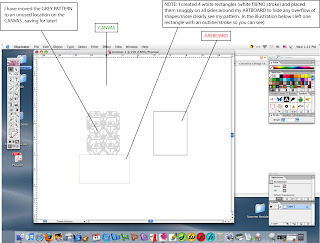
5. Select your ENTIRE PATTERN and drag to an unused area of your CANVAS - near ARTBOARD - OR toggle its visibility in the layer window. You're saving it for later, as a whole that fits your artboard. It might help it zoom out (press open apple and "+". To ZOOM IN: press open apple and "-". Use selection tool to select your ENTIRE PATTERN (make sure all other objects are deleted or out of the way so you won't select them too).
Illustration 3: Move/Save Pattern
6. Create a New Layer: Under WINDOW (top of screen) select the "LAYERS" window (make sure it is checked/selected) - you will see a small window appear listing the layers. Float your cursor over the small icons at the bottom of that window and select the one that reads "Create New Layer".
You now have two layers. One is your GREY PATTERN, and the second is coming up ..it will be your MAJOR FORMS. If you look at the layers window - you will notice each layer has a specific color. I believe #1-blue, #2-red. This is to aid you when selecting individual objects/paths in your composition.
Layer#1 - your 'selected' objects will be surrounded by a blue highlight
Layer#2 - your 'selected' objects will be surrounded by a red highlight
Illustration 4: Layers
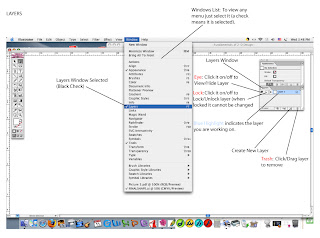
7. LOCK your first layer (so you don't have any accidents - or move things around without knowing): Lock the layer by clicking the box directly to the NEAR LEFT of your layer (in Layer window). You can still see your layer (you can reference it) but you don't run the risk of ruining it.
*To the FAR LEFT of each layer is a box with an EYE. Click the EYE on/off to VIEW or HIDE that layer.
Your GREY PATTERN layer is now:
*saved as a separate layer
*printed/pasted into sketchbook
*locked
!!!Make sure you select Layer #2 (in layer window) to continue the assignment!!!
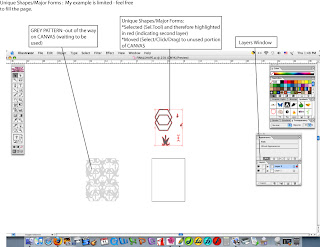
B. MAJOR FORMS - UNIQUE SHAPES (#1-7)
1. Choose 3-5 "figures" or "unique shapes" from your pattern and/or create 3-5 unique figures based on the language you established in your pattern: Choose those with the most successful and unique mixture of shapes/scale/proportion - but most importantly positive/negative and organic/geometric relationships. Spend some time with these figures. We're looking for exceptionally graphic shapes, unique, with strong form.
2. Change Fill Color of Your MAJOR FORMS (index) - they should all be a uniform dark grey: Select All of your unique shapes on ARTBOARD (Direct Selection-drag bounding box). Go to FILL in tool box (bottom left with no frame-remember?). Double click on FILL - color picker window will appear - move the circle to a DARKER GREY (a little over middle - not black).
!!!Two elements are now waiting on canvas - 1) Grey Pattern 2)Unique Shapes (approximately 3-5). These 3-5 shapes are your BUILDING BLOCKS for creating the next layer of your composition.!!!
Illustration 5: Unique Shapes/Major Forms Index
You will now be further editing/transforming these shapes (remember the selection tool [object as a whole] AND direct selection tools[segements/paths/lines of shapes/objects]?).
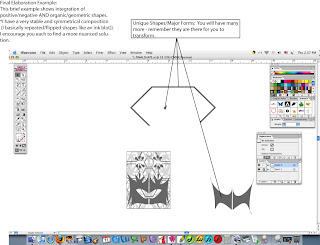
C.FINAL ELABORATION or "...putting it all together...."
You will now combine your Grey Pattern with your Unique Shapes and then begin to INTEGRATE your layers - weave them together! First, move your pattern back onto the ARTBOARD (or toggle visibility so you can see all layers). Then you will use your list of MAJOR FORMS to finish the composition. Similar to the final drawing of your Contrasting Line assignment, you should be paying attention to "integrating" you unique shapes with the pattern. Remember to further define/manipulate/mold each shape (change the characteristics of the shape: scale, rotate, add elements, subtract elements, etc.). Your unique shapes are your BUILDING blocks. Have fun pushing and pulling them around - but be mindful of how they fit into the whole composition (positive negative space, and organic/geometric relationships)!
INTEGRATE: I mean create a more complex spatial relation between constituent parts using location, proximity, direction, or similarity (line/shape quality, value, size/scale, etc.). If your unique shapes look like they're all floating on the surface - they need to be more integrated. You want to build relationships between the WHITE/NEGATIVE shapes of the background, with the LIGHT GREY shapes of the middle-ground, and then with the DARKER GREY shapes of the foreground.
1. Move GREY PATTERN to the ARTBOARD.
a. Select Layer #1 - GREY PATTERN (in layer window).
b. Select and move (click/drag) GREY PATTERN to fit back onto ARTBOARD.
c. Lock Layer #1 (again, to ensure you won't make unexpected changes).
2. Using your UNIQUE SHAPES build a composition ON TOP of your GREY PATTERN.
a. Begin to further transform/change/manipulate your UNIQUE SHAPES and place them on your GREY PATTERN (select-click/drag).
!!!IMPORTANT!!! This is where you really get to play with the shapes. You can push and pull there edges, rotate them, copy/paste/flip, etc. You're attempting to INTEGRATE them into the very stable and uniform GREY PATTERN - building a more complex space!!!
b. HINTS:
* Always keep in mind the principles!
* Is there one major/dominant form? Or Multiple?
* How do your UNIQUE SHAPES interact/locate themselves in relation to the pattern?
* Keep in mind CONTRAST (pos./neg - org./geo.)
3. SAVE and PRINT FINAL COMPOSITION FOR PRINTING.
a. PRINT: You will print your completed Shape Elaboration on thicker paper (Everyday Photo Paper, or Matte Photo Paper). Under FILE (top of screen) find PRINT and select. If you're printing through room 802 (Print Center). You need to be in the A+D building and working on a networked computer. Then click "PDF Drop Box" on the bottom of the screen (in the dock). You will be prompted to sign in - do so. Follow the directions. Remember that you need to have money on your Columbia College card to PAY FOR THE PRINT (you can do this through the Columbia College Website). Then go to room 802 and fill out a work order (detailing photo paper etc).
c. GLUE: Once you have your printed image: take out a sheet of bristol (from your pad), center your Shape Elaboration, and glue. Make sure to place a book or some flat weight on the image ensure it stays flat/evenly glued.
d. SAVE your work!!! Save them on:
*flashdrive
*cd/dvd
*they might be small enough files to save to an email account (attach them to an email to yourself)
Illustration 6: Final Elaboration
D. END STAGE INTEGRATION FOR SHAPE ELABORATIONS
To further play with space and shape relationships in your compositions (after you have a clear arrangement of White Background, Grey Pattern, Dark Grey Foreground) I suggest trying a few of these moves:
1. Add/Subtract whites and greys from earlier layers. Try adding a white rectangle to your composition and you will see that due to its similiarity to the background - you have effectively created a negative space. You don't have to keep that rectangle. But as an example - you can see how integrating the NEGATIVE shapes/spaces of your drawing can add a level of sophistication/nuance to your composition.
2. Change spatial arrangement of objects/unique shapes. Look at your LAYERS window. Layer #2 is ON TOP of #1. In order to bring a shape from the GREY PATTERN(#1) to the top (#2) you have to change its layer.
a. Select object/shape.
b. Select layer you want to move it to (one click).
c. Control/click back on object/shape and a menu will appear.
d. Float your cursor over ARRANGE - then select SEND TO CURRENT LAYER. Your shape is now on the layer you selected (#2) - but BEHIND everything else on that layer.
e. Control/Click on object (menu appears), go to ARRANGE - then BRING TO FRONT...and VOILA!
3. Create a THIRD LAYER to freely utilize the EXACT White, Light Grey, Darker Grey. LOCK OTHER LAYERS if neededand continue to create/move shapes between layers, copy/paste, transform - all on it's own layer.
Feel free to make some calculated choices here (with either option). Experiment, and see what happens with some of your choices..but remember this composition must be well balanced.
...And of course....OPEN APPLE+ Z will undo whatever decision you made...;)
Illustration 7: Bonus Additions
BRIEF! TOOL OVERVIEW:
To refamiliarize yourself with these tools..feel free to practice reworking your shapes on the canvas:
To the left of your workspace you have your menu of tools/tool box. Remember that when you see a tiny black arrow in the bottow right of a tool icon - that indicates there is a small menu of different options available for that tool. Click and hold over that icon...and you will see the menu...
*SELECTION TOOL(dark arrow cursor)- Select object by clicking on it. A 'bounding box' appears. Move whole object by clicking inside the object and dragging. Float cursor over the corner points (white/open squares) - and arrows will appear. These will allow you to rotate, skew, change scale, etc. To maintain proportions of the object (simply enlarge or reduce) - float cursor over anchor point (white box) until the straight-two sided arrow appears), then hold down SHIFT key, click and drag the mouse.
*DIRECT SELECTION (white arrow cursor) - Select individual paths by clicking DIRECTLY on them. Anchor points (small boxes where lines meet) can be open or closed (white or colored). When they're WHITE they are anchored. When they are colored they can be moved. They need to be white to manipulate the connecting lines. My advice is to try the shift click method...try moving the object at each stage: No points open, One point open, two points open, etc.
CLOSE ALL POINTS: Hold down OPTION and CLICK on object.
OPEN POINTS: Hold down SHIFT and CLICK on POINT - repeat to close that same point.
*PEN TOOL (looks like a pen) - Use this to create lines (curved/straight), shapes, etc., by adding subtracting, converting anchor points.
Pen: All around use...with shortcuts (holding down a key and clicking) you can add/subtract/convert all with one tool. Or you can find the manual options in the pen menu.
When using the pen tool - there are some shortcuts (when you hold down specific keys on your keyboard the icon will change until you release the key):
*You will notice that when you make ONE point with the pen tool, and then float the pen cursor back over that point - a negative icon shows up next to the pen. Click and the anchor point is removed. Hold down SHIFT and click..and you will add a new path from that point (not remove the point).
*Hold down OPTION -and you've switched to CONVERT ANCHOR POINT tool
*Hold down OPEN APPLE - and the pen turns into the DIRECT SELECTION tool
*COMMAND + CLICK: Hold down COMMAND/click to transform, rotate, scale, move, arrange layers, etc.
*COPY: COMMAND + C
*PASTE: COMMAND + V
*CUT: COMMAND + X
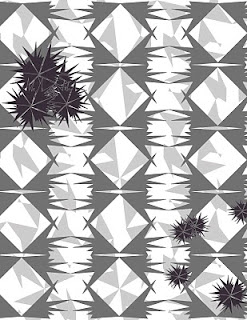
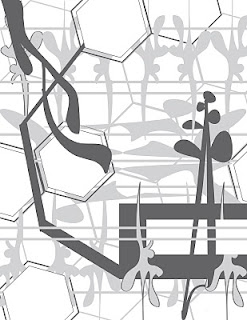
***Two Student Examples (obviously each of these examples needs to be further "integrated")
Shape Elaboration 1

Shape Elaboration #2
Shape Elaboration #3
.jpg)
Shape Elaboration #4
.jpg)
BRING TO CLASS:
*Shape Elaborations
*Check Website for additional materials
Illustrator: SHAPE (tools, layers, live trace)
Homework Overview
HOMEWORK:
*Finish Shape Elaborations (Illustrator)
*Check website for additional materials (if any...)
Finish: Shape Elaborations
Materials:
Illustrator/Computer Access + Printer access (9th Floor of Art+Design Building), bristol, one sheet of Matte Photo paper (you may have to purchase a small package if you're printing at home/otherwise the print lab will have the paper), and something to save your work on (FlashDrive, or you might be able to save them to an email account-attach them to an email to yourself).
Overview:
Using Illustrator create a composition based on strong figure/ground relationships utilizing geometric/organic and positive/negative shapes.
There are 3 levels or layers to this assignment (seen in your final composition):
Color - Form - Spatial Position
1. WHITE - (Color of Paper) - BACKGROUND
2. LIGHT GREY - PATTERN - MIDDLEGROUND
3. DARK GREY - MAJOR FORMS - FOREGROUND
Other than the white of the paper (or background color) - you will be creating each layer individually, then bringing them all together for your the final stage of the composition. I will outline the process step by step.
NOTE: Save your working document as .EPS and your printable documents as .PDF. When it's time to print, name your file according to this format (no spaces):
lastname
6 character date (ddmmyy)
filename
EXAMPLE: chamberlain020810myproject.pdf
Let us begin... I will state clearly and in simple language how to proceed through each step (in ITALICS and UNDERLINE) with a FURTHER definition following (for those who require additional assistance).
A. PATTERN CREATION (#1-7)
Create a pattern in a uniform light grey. Create a rhythm through repetition or alternation. Look under the SHAPE heading on this website for examples of wallpaper designs if needed. Think about your principles (use them as a check list to consider each).
1. *Open Illustrator (under graphics folder if you're at Columbia).
*New Document/Document Type Window: choose Print Document
*Letter Size (8.5 x 11")
*Name the file: (lastnamedateproject title).
Remember OPEN APPLE "S" to save your document every 5- 10 minutes or so.
2. On CANVAS (non-printable area): Create 5 unique shapes (organic/geometric/or mixture) that you will use to piece together/create your grey pattern.
*TOOLS: Pen, Pencil, Selection, Direct Selection, Shape Tools, Line Segment - any tools that can aid in your shape creation.
*NO STROKE. On the left of your screen you will see the tool menu/tool box. At the bottom are two overlapping squares: "FILL" and "STROKE". Activate STROKE - the square with a frame (click on it once to bring it forward/activate it). Below FILL and STROKE are a series of smaller boxes - look for the box with a RED SLASH. Click the red slash to DEACTIVATE STROKE. Your shapes will no longer have an outline/contour line.
*FILL COLOR: ALL LIGHT GREY. Again, bottom of tool box - activate FILL by clicking once on the square without a frame. Now double-click the FILL box and the COLOR PICKER window will appear. Inside the color swatch, click/drag the circle to the far left (towards a grey scale). Move your circle to the upper left - NOT WHITE but LIGHT GREY. Then click "okay". Your FILL color is now light grey.
*Vary the character of each shape (scale proportion, etc.) - remember they're all in relation to 8.5 x 11" (your printable area).
*Keep shapes simple and interesting
Illustration 1: Tools (these were made on an OLD version of Illustrator so your screen will look a bit different)
CLICK ON IMAGES FOR A LARGER VIEW

3. On ARTBOARD (printable area) select and arrange shapes (click and drag onto ARTBOARD)to create a FLAT - REPEATING MOTIF - a rhythmic pattern.
*REMEMBER-Only objects on ARTBOARD (printable area) will print. So some of your pattern can "overflow" onto canvas.
Illustration 2: Grey Pattern

4. Once your PATTERN is established on the artboard (you're satisfied with composition/result):
a. Delete any extra characters/objects/etc. on CANVAS -clean up work space! (simply select and hit delete)
5. Select your ENTIRE PATTERN and drag to an unused area of your CANVAS - near ARTBOARD - OR toggle its visibility in the layer window. You're saving it for later, as a whole that fits your artboard. It might help it zoom out (press open apple and "+". To ZOOM IN: press open apple and "-". Use selection tool to select your ENTIRE PATTERN (make sure all other objects are deleted or out of the way so you won't select them too).
Illustration 3: Move/Save Pattern

6. Create a New Layer: Under WINDOW (top of screen) select the "LAYERS" window (make sure it is checked/selected) - you will see a small window appear listing the layers. Float your cursor over the small icons at the bottom of that window and select the one that reads "Create New Layer".
You now have two layers. One is your GREY PATTERN, and the second is coming up ..it will be your MAJOR FORMS. If you look at the layers window - you will notice each layer has a specific color. I believe #1-blue, #2-red. This is to aid you when selecting individual objects/paths in your composition.
Layer#1 - your 'selected' objects will be surrounded by a blue highlight
Layer#2 - your 'selected' objects will be surrounded by a red highlight
Illustration 4: Layers

7. LOCK your first layer (so you don't have any accidents - or move things around without knowing): Lock the layer by clicking the box directly to the NEAR LEFT of your layer (in Layer window). You can still see your layer (you can reference it) but you don't run the risk of ruining it.
*To the FAR LEFT of each layer is a box with an EYE. Click the EYE on/off to VIEW or HIDE that layer.
Your GREY PATTERN layer is now:
*saved as a separate layer
*printed/pasted into sketchbook
*locked
!!!Make sure you select Layer #2 (in layer window) to continue the assignment!!!
B. MAJOR FORMS - UNIQUE SHAPES (#1-7)
1. Choose 3-5 "figures" or "unique shapes" from your pattern and/or create 3-5 unique figures based on the language you established in your pattern: Choose those with the most successful and unique mixture of shapes/scale/proportion - but most importantly positive/negative and organic/geometric relationships. Spend some time with these figures. We're looking for exceptionally graphic shapes, unique, with strong form.
2. Change Fill Color of Your MAJOR FORMS (index) - they should all be a uniform dark grey: Select All of your unique shapes on ARTBOARD (Direct Selection-drag bounding box). Go to FILL in tool box (bottom left with no frame-remember?). Double click on FILL - color picker window will appear - move the circle to a DARKER GREY (a little over middle - not black).
!!!Two elements are now waiting on canvas - 1) Grey Pattern 2)Unique Shapes (approximately 3-5). These 3-5 shapes are your BUILDING BLOCKS for creating the next layer of your composition.!!!
Illustration 5: Unique Shapes/Major Forms Index

You will now be further editing/transforming these shapes (remember the selection tool [object as a whole] AND direct selection tools[segements/paths/lines of shapes/objects]?).
C.FINAL ELABORATION or "...putting it all together...."
You will now combine your Grey Pattern with your Unique Shapes and then begin to INTEGRATE your layers - weave them together! First, move your pattern back onto the ARTBOARD (or toggle visibility so you can see all layers). Then you will use your list of MAJOR FORMS to finish the composition. Similar to the final drawing of your Contrasting Line assignment, you should be paying attention to "integrating" you unique shapes with the pattern. Remember to further define/manipulate/mold each shape (change the characteristics of the shape: scale, rotate, add elements, subtract elements, etc.). Your unique shapes are your BUILDING blocks. Have fun pushing and pulling them around - but be mindful of how they fit into the whole composition (positive negative space, and organic/geometric relationships)!
INTEGRATE: I mean create a more complex spatial relation between constituent parts using location, proximity, direction, or similarity (line/shape quality, value, size/scale, etc.). If your unique shapes look like they're all floating on the surface - they need to be more integrated. You want to build relationships between the WHITE/NEGATIVE shapes of the background, with the LIGHT GREY shapes of the middle-ground, and then with the DARKER GREY shapes of the foreground.
1. Move GREY PATTERN to the ARTBOARD.
a. Select Layer #1 - GREY PATTERN (in layer window).
b. Select and move (click/drag) GREY PATTERN to fit back onto ARTBOARD.
c. Lock Layer #1 (again, to ensure you won't make unexpected changes).
2. Using your UNIQUE SHAPES build a composition ON TOP of your GREY PATTERN.
a. Begin to further transform/change/manipulate your UNIQUE SHAPES and place them on your GREY PATTERN (select-click/drag).
!!!IMPORTANT!!! This is where you really get to play with the shapes. You can push and pull there edges, rotate them, copy/paste/flip, etc. You're attempting to INTEGRATE them into the very stable and uniform GREY PATTERN - building a more complex space!!!
b. HINTS:
* Always keep in mind the principles!
* Is there one major/dominant form? Or Multiple?
* How do your UNIQUE SHAPES interact/locate themselves in relation to the pattern?
* Keep in mind CONTRAST (pos./neg - org./geo.)
3. SAVE and PRINT FINAL COMPOSITION FOR PRINTING.
a. PRINT: You will print your completed Shape Elaboration on thicker paper (Everyday Photo Paper, or Matte Photo Paper). Under FILE (top of screen) find PRINT and select. If you're printing through room 802 (Print Center). You need to be in the A+D building and working on a networked computer. Then click "PDF Drop Box" on the bottom of the screen (in the dock). You will be prompted to sign in - do so. Follow the directions. Remember that you need to have money on your Columbia College card to PAY FOR THE PRINT (you can do this through the Columbia College Website). Then go to room 802 and fill out a work order (detailing photo paper etc).
c. GLUE: Once you have your printed image: take out a sheet of bristol (from your pad), center your Shape Elaboration, and glue. Make sure to place a book or some flat weight on the image ensure it stays flat/evenly glued.
d. SAVE your work!!! Save them on:
*flashdrive
*cd/dvd
*they might be small enough files to save to an email account (attach them to an email to yourself)
Illustration 6: Final Elaboration

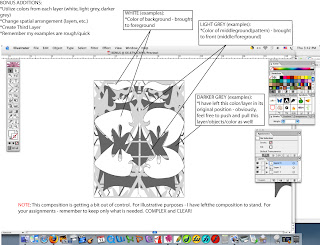
D. END STAGE INTEGRATION FOR SHAPE ELABORATIONS
To further play with space and shape relationships in your compositions (after you have a clear arrangement of White Background, Grey Pattern, Dark Grey Foreground) I suggest trying a few of these moves:
1. Add/Subtract whites and greys from earlier layers. Try adding a white rectangle to your composition and you will see that due to its similiarity to the background - you have effectively created a negative space. You don't have to keep that rectangle. But as an example - you can see how integrating the NEGATIVE shapes/spaces of your drawing can add a level of sophistication/nuance to your composition.
2. Change spatial arrangement of objects/unique shapes. Look at your LAYERS window. Layer #2 is ON TOP of #1. In order to bring a shape from the GREY PATTERN(#1) to the top (#2) you have to change its layer.
a. Select object/shape.
b. Select layer you want to move it to (one click).
c. Control/click back on object/shape and a menu will appear.
d. Float your cursor over ARRANGE - then select SEND TO CURRENT LAYER. Your shape is now on the layer you selected (#2) - but BEHIND everything else on that layer.
e. Control/Click on object (menu appears), go to ARRANGE - then BRING TO FRONT...and VOILA!
3. Create a THIRD LAYER to freely utilize the EXACT White, Light Grey, Darker Grey. LOCK OTHER LAYERS if neededand continue to create/move shapes between layers, copy/paste, transform - all on it's own layer.
Feel free to make some calculated choices here (with either option). Experiment, and see what happens with some of your choices..but remember this composition must be well balanced.
...And of course....OPEN APPLE+ Z will undo whatever decision you made...;)
Illustration 7: Bonus Additions

BRIEF! TOOL OVERVIEW:
To refamiliarize yourself with these tools..feel free to practice reworking your shapes on the canvas:
To the left of your workspace you have your menu of tools/tool box. Remember that when you see a tiny black arrow in the bottow right of a tool icon - that indicates there is a small menu of different options available for that tool. Click and hold over that icon...and you will see the menu...
*SELECTION TOOL(dark arrow cursor)- Select object by clicking on it. A 'bounding box' appears. Move whole object by clicking inside the object and dragging. Float cursor over the corner points (white/open squares) - and arrows will appear. These will allow you to rotate, skew, change scale, etc. To maintain proportions of the object (simply enlarge or reduce) - float cursor over anchor point (white box) until the straight-two sided arrow appears), then hold down SHIFT key, click and drag the mouse.
*DIRECT SELECTION (white arrow cursor) - Select individual paths by clicking DIRECTLY on them. Anchor points (small boxes where lines meet) can be open or closed (white or colored). When they're WHITE they are anchored. When they are colored they can be moved. They need to be white to manipulate the connecting lines. My advice is to try the shift click method...try moving the object at each stage: No points open, One point open, two points open, etc.
CLOSE ALL POINTS: Hold down OPTION and CLICK on object.
OPEN POINTS: Hold down SHIFT and CLICK on POINT - repeat to close that same point.
*PEN TOOL (looks like a pen) - Use this to create lines (curved/straight), shapes, etc., by adding subtracting, converting anchor points.
Pen: All around use...with shortcuts (holding down a key and clicking) you can add/subtract/convert all with one tool. Or you can find the manual options in the pen menu.
When using the pen tool - there are some shortcuts (when you hold down specific keys on your keyboard the icon will change until you release the key):
*You will notice that when you make ONE point with the pen tool, and then float the pen cursor back over that point - a negative icon shows up next to the pen. Click and the anchor point is removed. Hold down SHIFT and click..and you will add a new path from that point (not remove the point).
*Hold down OPTION -and you've switched to CONVERT ANCHOR POINT tool
*Hold down OPEN APPLE - and the pen turns into the DIRECT SELECTION tool
*COMMAND + CLICK: Hold down COMMAND/click to transform, rotate, scale, move, arrange layers, etc.
*COPY: COMMAND + C
*PASTE: COMMAND + V
*CUT: COMMAND + X
***Two Student Examples (obviously each of these examples needs to be further "integrated")
Shape Elaboration 1

Shape Elaboration #2

Shape Elaboration #3
.jpg)
Shape Elaboration #4
.jpg)
BRING TO CLASS:
*Shape Elaborations
*Check Website for additional materials
0 comments:
Post a Comment